Next Generation
Databases: NoSQL,
NewSQL and Big Data

Buy at Amazon
Buy at Apress

Search

Oracle Performance Survival Guide

Buy It
Read it on Safari
Scripts and Examples
Sample Chapter


 MySQL Stored procedure programming

Buy It
Read it on Safari
Scripts and Examples 


Entries in amazon (2)

Monday
Dec052011

Amazon Elastic Map Reduce (EMR), Hive, and TOAD

Since my first post on connecting to Amazon Elastic Map Reduce with TOAD, we’ve added quite a few features to our Hadoop support in general and our EMR support specifically, so I thought I’d summarize those features in this blog post

Amazon Elastic Map Reduce is a cloud-based version of Hadoop hosted on Amazon Elastic Compute Cloud (EC2) instance.  Using EMR, you can quickly establish a cloud based Hadoop cluster to perform map reduce work flows. 

EMR support Hive of course, and Toad for Cloud Databases (TCD)  includes Hive support, so let’s look at using that to query EMR data.

Using the Toad direct Hive client


TCD direct Hive connection support is the quickest way to establish a connection to Hive.  It uses a bundled JDBC driver to establish the connection.

Below we create a new connection to a Hive server running on EMR:

image

  1. Right click on Hive connections and choose “Connect to Hive” to create a new Hive connection.
  2. The host address is the “Master” EC2 instance for your EMR cluster.  You’ll find that on the EMR Job flow management page within your Amazon AWS console.  The Hive 0.5 server is running on port 10000 by default.
  3. Specifying a job tracker port allows us to track the execution of our Hive jobs in EMR.  The standard Hadoop jobtracker port is 50030, but in EMR it’s 9600.
  4. It’s possible to open up port 10000 so you can directly connect with Hive clients, but it’s a bad idea usually.  Hive has negligible built-in security, so you’d be exposing your Hive data.   For that reason we support a SSH mode in which you can tunnel through to your hadoop server using the keypair file that you used to start the EMR job flow.  The key name is also shown in the EMR console page, though obviously you’ll need to have an actual keypair file.

The direct Hive client allows you to execute any legal Hive QL commands.  In the example below, we create a new Hive table based on data held in an S3 bucket (The data is some UN data on homicide rates I uploaded).

SNAGHTML9c66e8d

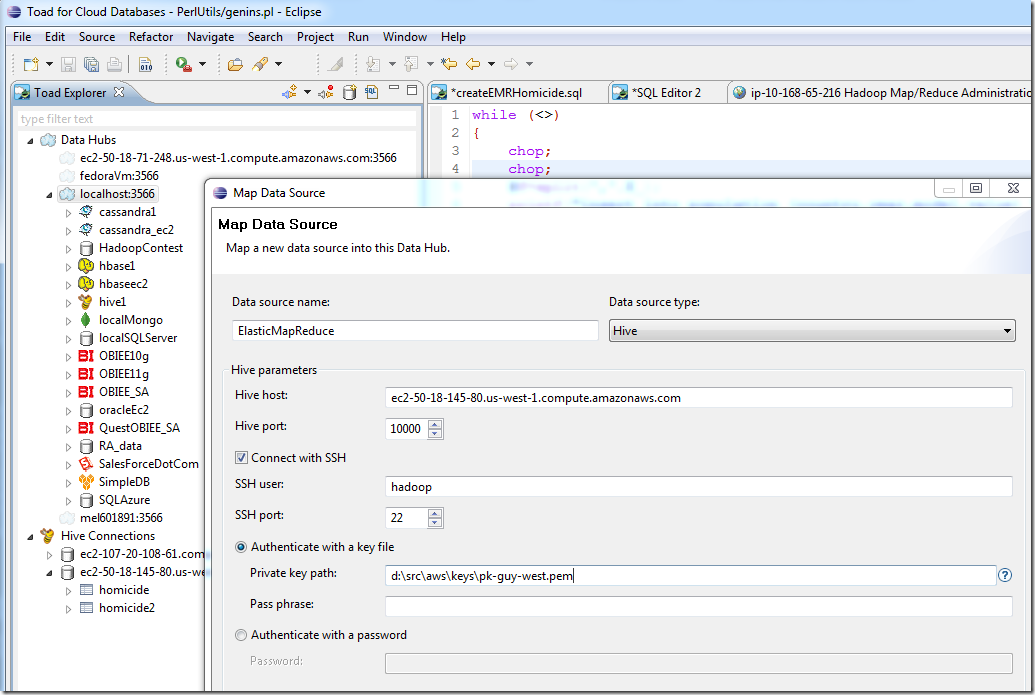
Connecting Hive to the Toad data hub


It’s great to be able to use Hive to exploit Map Reduce using familiar (to me) SQL-like syntax.  But the real advantage of TCD for Hive is that we link to data that might be held in other sources – like Oracle, Cassandra, SQL Server, MongoDB, etc.

Setting up a hub connection to EMR hive is very similar to setting up a direct connection.  Of course you need a data hub installed (see here for instructions), then right click on the hub node and select “map data source”:

Now that the hub knows about the EMR hive connection, we can issue queries that access Hive and – in the same SQL – other datasources. For instance, here’s a query that joins homicide data in Hive Elastic Map Reduce with population data stored in a Oracle database (running as Amazonn RDS:  Relational Database Service).  We can do these cross platform joins across a lot of different types of database sources, including any ODBC compliant databases, any Apache Hbase or Hive connections, Cassandra, MongoDB, SimpleDB, Azure table services:

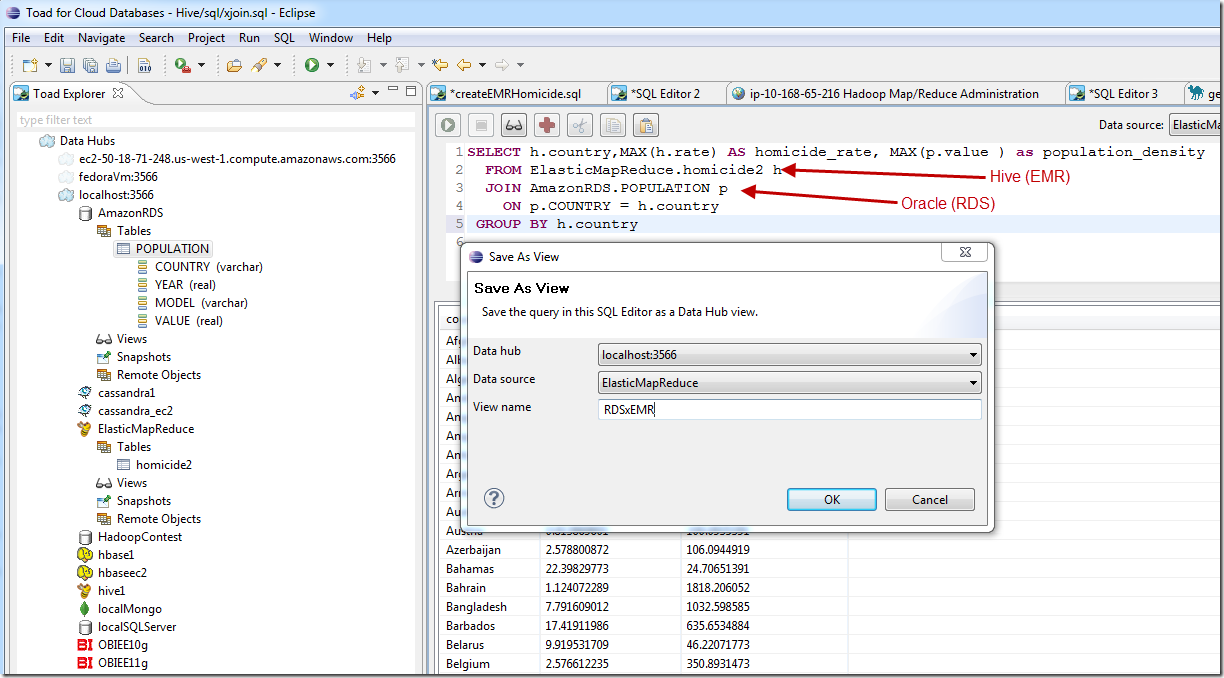
In the version that we are just about to release, queries can be saved as views or snapshots, allowing easier access from external tools of for users who aren’t familiar with SQL.   In the example above, I’m saving my query as a view.


Using other hub-enabled clients


TCD isn’t the only product that can issue hub queries.  In beta today, the Quest Business Intelligence Studio can attach to the data hub, and allows you to graphically explore you data using drag and drop, click and drilldown paradigms:

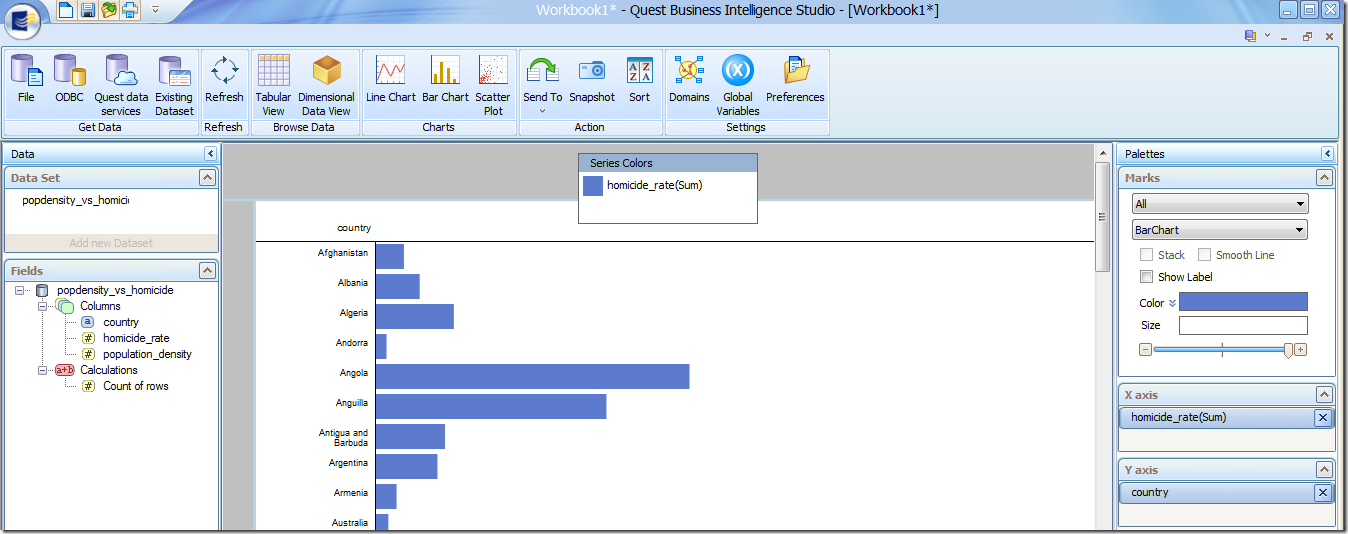
It’s great to be living in Australia – one of the lowest homicide rates!

If you’re a hard core data scientist, you can even attach R through to the hub via the RODBC interface.  So for instance, in the screen shot below, I’m using R to investigate the correlation  between population density and homicide rate.  The data comes from Hive (EMR) and Oracle (RDS),  is joined in the hub, saved as a snapshot and then feed into R for analysis.  Pretty cool for a crusty old stats guy like me (My very first computer program was written in 1979 on SPSS).

image

Wednesday
Jun082011

A first look at Oracle on Amazon RDS

It's been possible for a some time to run Oracle within the Amazon cloud.  I wrote an introduction to Oracle on EC2 back in 2008,  and we use an EC2 pretty extensively here at quest for testing and deployment.   Up until now, Oracle has been made available within EC2 instances which appear for all purposes to be remote hosts.  Recently, Amazon  made oracle available in a more directly cloud based fashion as one of the options to their Relational Database Service (RDS).  Using RDS, Amazon takes complete responsibility for database management providing a more complete Database As A Service (DBaaS) offering, similar to what Microsoft offers with SQL Azure.   Amazon handles installation, upgrades, backups and so forth.  In theory, you can use the database without needing to do any administrative work.

Indeed Amazon on takes so much responsibility that long-time DBAs like me are unlikely to be really happy; the very notion of being unable to connect to the operating system for instance is disturbing, and it’s currently missing support for many of our favourite tools.

However I wanted to give it a test drive, so here's some screenshots and observations to give you a feel for it.

Creating the Oracle RDS database


To use any of the Amazon cloud facilities, you need and Amazon AWS account.  Once you have that, you create a new RDS database from the AWS console, where you can launch a new MySQL or Oracle database:

image

You then specify the parameters for the new instance.  At the time of writing, some of these screens clearly had not been updated from the older MySQL options.  Here we can specify:

  • Type of license.   If you have a site license you can use that (as I have below).  If not you can pay Amazon by the hour and Amazon presumably kick some of that back to Oracle.
  • Oracle version.  Note also that you can ask to have the version updated for you with patches automatically – quite cool. 
  • Instance Class.  This is the size of the virtual machine and determines memory and CPU availability.  These match the equivalent EC2 instance types (see http://aws.amazon.com/ec2/#instance) and vary from 1 core with 1.7GB to 8 (faster) cores with 64GB).   Charging varies accordingly of course.
  • DB instance identifier.  At first you might think that is the database service name, but NO, it’s an Amazon identifier.  You specify the service name on the next page.
  • Username and Password of the DBA account you’ll use.

image

On next page we specify the database (eg Service/SID) name and the port.  NOTE that at the moment the default port is 3306, which is the MySQL listener port – you should change it if you want a more familiar listener port like 1521.

image


Click OK a couple more times and your database will start up.  Takes 5 minutes or so to get running.

Connecting to the database


Before you can connect, however, you’ll need to create a security group which essentially defines the Amazon firewall for your instance.   Below I’m configuring to let anything through (not ideal, but I travel a lot so I can’t predict my IP address range).  The CDIR/IP is a mask that defines what IP addresses will be allowed to connect to the database instance. 

image

Now we can connect.  We need to know the hostname, which is shown as the “Endpoint” in the DB Instance description page.    The port and service name are also here:

image

We could create a TNSNAMES entry using those details or connect via SQL Plus in the form username/password@host:port/Service.  Below, I specify these details directly into TOAD:


image

Restrictions


As easy as it is to get started with RDS, there are a lot of restrictions.  Most significantly:

  • You can’t connect to the OS. 
  • Datafiles must be Oracle Managed Files.  No filesytem specifications are allowed.  ASM is not supported.
  • Some commands are not supported, including ALTER SYSTEM.  However there are PLSQL packages that provide a lot of the common facilities such as switching logs, checkpointing, tracing and killing sessions.
  • You can only access the alert log and trace files via an external table interface
  • No OEM!!!  And for that matter, monitoring products such as Quest’s own Spotlight and Foglight cannot be installed (due to the above restrictions).   Even some parts of TOAD won’t function since they rely on forbidden commands 

The idea with RDS and these missing features  is that “you ain’t going to need it” -  the database is self managing and these DBA utilities simply aren’t required.   For more details check out this part of the RDS manual.


Changing the database CPU and memory


One of the great things about RDS is that you can resize the instance.  If  you want more memory or CPU, you can use the modify tab to change the specification:

image

This does require a reboot, which either happens during the maintenance window or – if you so specified – immediately.   Still, much easier than achieving the same result on EC2 – which is almost impossible.

Monitoring


Although there’s no OEM and no way to run Spotlight or other 3rd party monitoring tools, there is a very basic monitoring screen.

image

Parameters

Parameters are managed through parameter groups, which assign values dynamically.  For instance, in the default parameter group, memory target is set to 75% of total system memory.  If you reboot the system into a higher class, the memory will change.  You can change the values for a parameter group and you can create your own.

image

Conclusion


End to end, it probably takes about 10 minutes to get set up once you have your account details.  Not bad.  And Amazon takes care of backups and the like.

However, it’s probably not something I’ll ever do again, because I can’t really cope with the idea of not being able to go directly to the alert log, trace files, etc.  And I definitely don’t like not being able to use tools like Spotlight or even OEM.   Amazon provides work arounds for lots of this stuff – see this page for instance – but I’m too used to the command line Smile.  Still, it’s worth knowing how this all works and – who knows – it might be handy one day when I want to quickly set up a 64GB SGA database